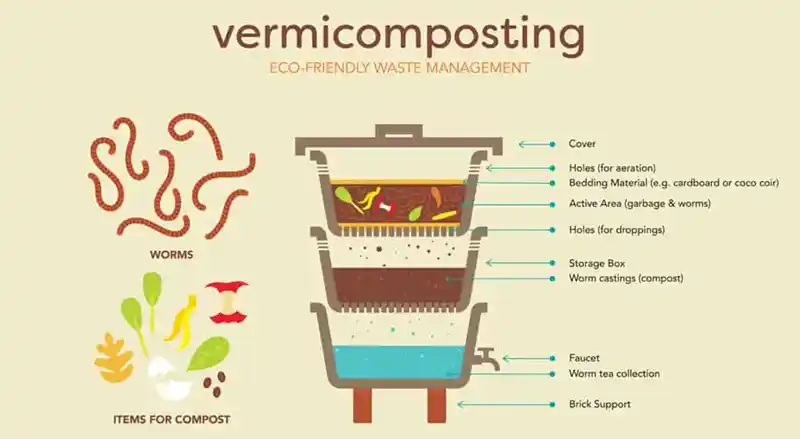
Embarking on the journey of vermicomposting is a fantastic way to recycle kitchen waste and produce nutrient-rich compost for your garden. This method not only reduces waste but also enhances soil health and plant growth. In this guide, we’ll explore a simple yet effective way to create your own vermicomposter using a three-tote system.
What You’ll Need
- Three Plastic Totes: Choose three stackable, plastic storage bins or totes. Each should have a lid and be about 10-18 gallons in size. Ensure they are opaque to keep worms in the dark, which they prefer.
-
Drill: To create ventilation holes and drainage in the totes.
-
Worms: Red wigglers (Eisenia fetida) are the best choice for vermicomposting. They are highly efficient at breaking down organic matter.
-
Bedding Material: Shredded newspaper, cardboard, or coconut coir works well. Bedding provides a habitat for the worms and helps absorb moisture.
-
Kitchen Scraps: Fruit and vegetable scraps, coffee grounds, and eggshells are ideal. Avoid meat, dairy, and oily foods.
Steps to Create Your Vermicomposter
1. Prepare the Totes
- Ventilation: Use the drill to create small holes (about ¼ inch) in the bottom of the first and second totes for drainage and air circulation. Space the holes evenly to ensure proper airflow.
- Stacking: Place the third tote at the bottom of the stack. This will collect any liquid leachate that drains from the upper bins. You can also drill holes in the sides of this tote near the bottom to allow excess moisture to escape.
2. Set Up the Bedding
- Bedding Layer: Shred newspaper or cardboard into small pieces and moisten it with water. The bedding should be damp but not soggy, like a wrung-out sponge.
- Layering: Fill the first tote with about 4-6 inches of this bedding material. This will be the initial environment for the worms.
3. Introduce the Worms
- Adding Worms: Gently place the red wigglers onto the bedding in the first tote. They will naturally burrow into the bedding and start acclimating to their new environment.
- Worm Care: Avoid disturbing the worms for the first few days to allow them to adjust to their new habitat.
4. Add Kitchen Scraps
- Feeding: Begin adding kitchen scraps to the bedding, placing them in small amounts to avoid overwhelming the worms. Bury the scraps in the bedding to minimize odors and discourage pests.
- Maintenance: Continue to add scraps regularly but avoid overloading the system. Monitor the moisture level and adjust as needed.
5. Manage the System
- Air Circulation: Ensure good airflow by keeping the lids slightly ajar or using ventilation holes. Proper airflow helps prevent odor and supports worm health.
- Moisture Levels: Maintain proper moisture levels by adding water or more bedding if the system becomes too wet. If too dry, lightly mist the bedding.
6. Harvest the Compost
- Separating Compost: After a few months, the first tote will be filled with rich, dark compost. To harvest it, move the finished compost to one side of the tote and add fresh bedding and scraps to the empty side. The worms will migrate to the new bedding, allowing you to collect the compost from the other side.
- Using Compost: The harvested compost can be used to enrich garden soil, improve plant health, and boost overall garden productivity.
7. Recycle the Totes
- Cycle: Once the compost is harvested, you can begin using the second tote, repeating the process. After the first tote is emptied, it can be placed on top of the second tote, which will now become the active compost bin.
Benefits of Vermicomposting
- Waste Reduction: By converting kitchen scraps into compost, you significantly reduce household waste.
- Nutrient-Rich Compost: The compost produced is an excellent natural fertilizer, providing essential nutrients and improving soil structure.
- Environmental Impact: Vermicomposting is an eco-friendly practice that contributes to sustainability by recycling organic materials.
By following these steps, you can create an efficient and productive vermicomposting system using a three-tote setup. This approach not only helps manage kitchen waste but also enriches your garden with high-quality compost, enhancing the health and productivity of your plants.
