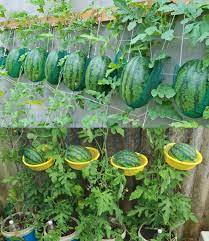
Growing watermelons at home in containers is a rewarding way to enjoy fresh, juicy fruit even if you have limited space. With the right techniques, you can successfully cultivate watermelons in pots or containers. Here’s a step-by-step guide to help you get started:
Step-by-Step Guide to Growing Watermelons in Containers
1. Choose the Right Container
- Size: Opt for a large container with a minimum diameter of 18-24 inches. Watermelons need ample space for their roots to grow and spread.
- Drainage: Ensure the container has drainage holes to prevent waterlogging and root rot.
2. Select the Right Watermelon Variety
- Space-Saving Varieties: Choose compact or dwarf watermelon varieties like ‘Sugar Baby’ or ‘Bush Sugar Baby.’ These are bred to grow well in containers.
- Hybrid Varieties: Some hybrids are specifically designed for container gardening and may offer better results.
3. Prepare the Soil
- Soil Mix: Use a high-quality potting mix rich in organic matter. A mix of compost, peat moss, and perlite provides good drainage and nutrition.
- pH Level: Watermelons prefer slightly acidic to neutral soil with a pH of 6.0-7.0.
4. Planting Watermelons
- Timing: Start seeds indoors 6-8 weeks before the last frost date, or sow seeds directly outdoors after the threat of frost has passed and the soil temperature reaches 70°F (21°C).
- Sowing: Plant seeds 1 inch deep in the soil. Space them about 1-2 inches apart. If using seedlings, transplant them when they have 2-3 sets of true leaves.
- Spacing: In containers, you can plant 1-2 seedlings per pot, depending on the container size.
5. Provide Adequate Light
- Sunlight: Watermelons need full sun for at least 6-8 hours a day. Place your containers in a sunny location or use supplemental grow lights if growing indoors.
6. Watering
- Consistency: Keep the soil consistently moist but not waterlogged. Water when the top inch of soil feels dry.
- Technique: Water at the base of the plant to avoid wetting the foliage, which can lead to fungal diseases.
7. Fertilizing
- Nutrients: Use a balanced fertilizer (e.g., 10-10-10) or one high in potassium and phosphorus to encourage fruit development. Follow the manufacturer’s instructions for application rates.
- Frequency: Fertilize every 3-4 weeks during the growing season.
8. Supporting the Vines
- Staking: As the watermelon vines grow, provide support using stakes or a trellis. This helps keep the fruit off the ground and prevents rot.
- Trellising: For compact varieties, a trellis or cage can support the vines and allow the fruit to dangle.
9. Pollination
- Manual Pollination: If you’re growing indoors or have limited pollinators, manually pollinate the flowers using a small brush or cotton swab to transfer pollen from male to female flowers.
10. Harvesting
- Timing: Watermelons are usually ready to harvest 70-90 days after planting, depending on the variety. Check for ripeness by:
- Color: The underside of the melon should turn from white to a creamy yellow.
- Sound: The melon should produce a deep, hollow sound when tapped.
- Tendrils: The tendril closest to the fruit should be dry and brown.
Tips for Success
- Pest Control: Keep an eye out for pests like aphids or spider mites. Use organic insecticides or neem oil if needed.
- Temperature: Watermelons thrive in warm temperatures. Protect the plants from frost and extreme cold.
Growing watermelons in containers allows you to enjoy this delicious fruit even in small spaces. With proper care and attention, you’ll be rewarded with sweet, home-grown watermelons that are perfect for summer enjoyment. Happy gardening!
