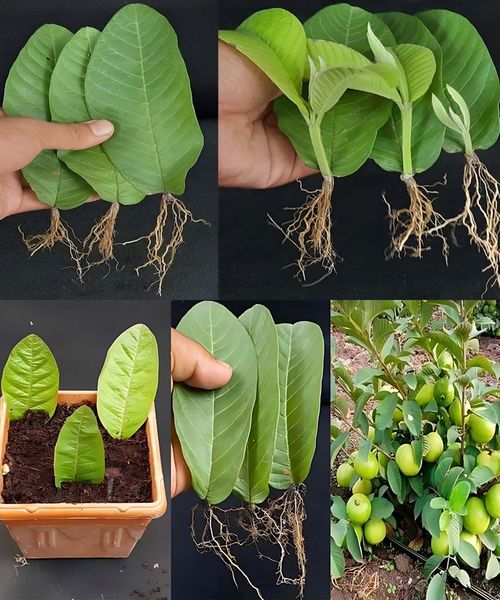
How to Grow Guava Trees from Guava Leaves at Home: A Detailed Guide
Growing guava trees from guava leaves is an unconventional but fascinating propagation method. With the right techniques, you can cultivate your own guava trees and eventually enjoy fresh guavas. Here’s a step-by-step guide to help you successfully propagate guava trees from leaves.
Materials Needed:
- Healthy guava leaves
- Clean, sharp scissors or pruning shears
- Rooting hormone (optional)
- Small pots or seed trays
- Well-draining potting mix (a blend of peat moss, perlite, and compost)
- Clear plastic bags or a propagation dome
- Watering can or spray bottle
- Larger pots or garden space for final transplanting
Step-by-Step Guide:
1. Selecting and Preparing Guava Leaves
- Choosing Leaves: Opt for mature, healthy guava leaves from a robust guava tree. Ensure the leaves are free from any disease or damage.
- Cutting Leaves: Use clean, sharp scissors or pruning shears to cut the leaves, leaving a small piece of the stem attached to each leaf.
2. Preparing for Propagation
- Optional Rooting Hormone: To enhance root development, dip the cut end of the leaf’s stem into rooting hormone powder or gel. This step is optional but can improve success rates.
3. Planting the Guava Leaves
- Preparing Pots: Fill small pots or seed trays with a well-draining potting mix. Slightly moisten the mix.
- Inserting Leaves: Insert the cut end of the leaf’s stem into the potting mix, ensuring the leaf remains upright. Gently press the soil around the stem to stabilize it.
4. Creating a Humid Environment
- Covering Pots: Use clear plastic bags to cover the pots or place them under a propagation dome to maintain high humidity, which aids in rooting.
- Ventilation: To prevent mold, provide some airflow by removing the plastic cover periodically for ventilation.
5. Placement and Care
- Light: Place the pots in a warm, bright spot with indirect sunlight. Guava leaves thrive in high humidity and warmth during propagation.
- Watering: Keep the potting mix consistently moist, but not soggy. Use a spray bottle or a watering can with a gentle nozzle to avoid disturbing the soil.
6. Monitoring Growth
- Root Development: Check for root formation regularly. Rooting can take several weeks to a few months.
- New Growth: Look for signs of new growth at the base of the leaves, indicating successful rooting.
7. Transplanting
- Ready for Transplanting: When roots are visible and new growth has appeared, carefully transplant the guava leaves into larger pots or directly into the garden.
- Preparing Soil: Use a potting mix with compost for container planting or prepare a garden bed with well-draining soil.
8. Caring for Transplanted Guava Trees
- Watering: Water regularly to keep the soil moist, especially during dry spells.
- Sunlight: Ensure the guava trees receive full sunlight for 6-8 hours a day to promote healthy growth.
- Fertilization: Apply a balanced fertilizer during the growing season to support strong roots and lush foliage.
9. Long-Term Maintenance
- Pruning: Prune the guava trees as needed to shape them and encourage bushy growth.
- Pest Control: Monitor for pests and diseases, treating any issues promptly to maintain plant health.
- Patience: Guava trees may take a few years to mature and begin producing fruit.
10. Enjoying Your Guava Trees
- Harvesting: Once the trees mature, they will produce fragrant, delicious guavas. Harvest the fruit when it’s ripe and enjoy the results of your efforts.

